Removing a PCI riser-cage assembly in the GPU tray

Note: PCI riser-cage brackets must be installed even if you do not install a GPU adapter.

To remove a PCI riser-cage assembly in the GPU tray, complete the following steps:

  1. Read the safety information that begins on Safety and Installation guidelines.
  2. Turn off the server and peripheral devices and disconnect the power cords and all external cables.
  3. Remove the GPU tray from the compute node (see Removing a GPU tray from a compute node).
  4. Remove the cover (see Removing the compute node cover).
  5. Remove the air baffle (see Removing the air baffle) if you are removing the rear PCI riser-cage assembly.
  6. Grasp the rear side of the PCI riser-cage touch point and the front PCI rise-cage suitable location of the PCI riser-cage assembly. Use your thumb to press down the right hand side bezel (a tiny square surface) of the compute node; then lift it out of the PCI riser-cage slot on the system board.
    Figure 1. Front PCI riser-cage assembly removal
    Front PCI riser-cage assembly removal
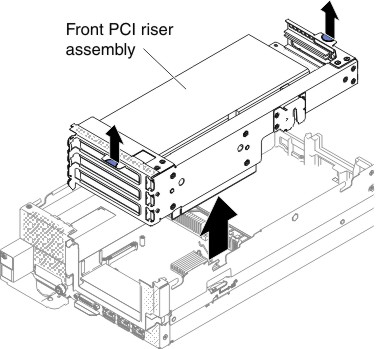
    Figure 2. Rear PCI riser-cage assembly removal
    Rear PCI riser-cage assembly removal
  7. If a GPU adapter is installed in the PCI riser-cage assembly, disconnect any cables that are connected to the adapter.
  8. Remove the GPU adapter, if one is present, from the PCI riser-cage assembly (see Removing an adapter/GPU adapter).
  9. Set the GPU adapter and the PCI riser-cage assembly aside.
  10. If you are instructed to return the PCI riser-cage assembly, follow all packaging instructions, and use any packaging materials for shipping that are supplied to you.