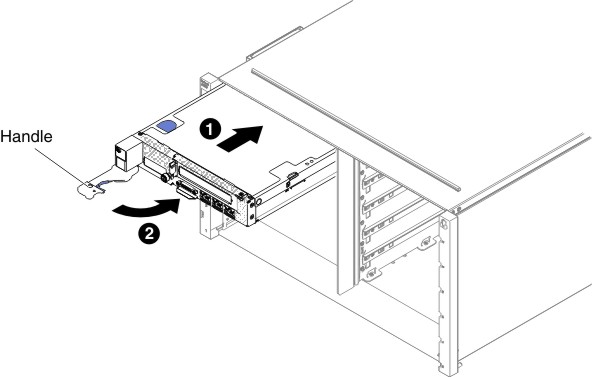
Use this information to install a compute node in a IBM NeXtScale n1200 Enclosure.
Statement 21![]()
If you are installing a compute node model without an integrated Ethernet controller, you must install a network interface adapter before you install the compute node in the chassis for management network communication. For a list of supported optional devices for the compute node, see the IBM ServerProven website.
The following tables provide an indication of the quantity of nodes that can be installed in a chassis for specific processor types assuming nodes have all DIMM slots, PCIe slots, and hard disk drives populated. The tables are based on 900-watt or 1300-watt power supplies and the indicated power settings. However, when building a NeXtScale n1200 Enclosure solution, you are required to validate the power requirements for your configuration using the latest version of the IBM Power Configurator to ensure that the number of power supplies selected are adequate for supporting your chassis configuration. Failure to validate the configuration with the IBM Power Configurator tool could result in system errors, failure to power on, or microprocessor throttling, and limiting system's ability to leverage all of the microprocessor performance. The Power Configurator tool can be found at the IBM Power Configurator for System x, BladeCenter, and Flex System website. If there are questions or issues regarding a configuration and Power Configurator, please send them to power@us.ibm.com.
| Microprocessor SKU (W) | # of microprocessor(s) |
Non-redundant or N+1 with OVS1, N=5 | N+1 redundant, N=5 | N+N redundant, N=3 | N+N redundant with OVS1, N=3 |
|---|---|---|---|---|---|
| 50 | 1 | 12 | 12 | 12 | 12 |
| 2 | 12 | 12 | 11 | 12 | |
| 60 | 1 | 12 | 12 | 12 | 12 |
| 2 | 12 | 12 | 10 | 12 | |
| 70 | 1 | 12 | 12 | 12 | 12 |
| 2 | 12 | 12 | 8 | 11 | |
| 80 | 1 | 12 | 12 | 11 | 12 |
| 2 | 12 | 12 | 8 | 9 | |
| 95 | 1 | 12 | 12 | 10 | 12 |
| 2 | 12 | 12 | 6 | 10 | |
| 115 | 1 | 12 | 12 | 8 | 10 |
| 2 | 12 | 10 | 5 | 8 | |
| 130 | 1 | 12 | 12 | 7 | 9 |
| 2 | 10 | 8 | 4 | 7 |
| Microprocessor SKU (W) | # of microprocessor(s) |
Non-redundant or N+1 with OVS1, N=5 | N+1 redundant, N=5 | N+N redundant, N=3 | N+N redundant with OVS1, N=3 |
|---|---|---|---|---|---|
| 50 | 1 | 12 | 12 | 9 | 11 |
| 2 | 12 | 12 | 6 | 10 | |
| 60 | 1 | 12 | 12 | 7 | 9 |
| 2 | 12 | 9 | 5 | 7 | |
| 70 | 1 | 12 | 12 | 7 | 9 |
| 2 | 12 | 9 | 5 | 7 | |
| 80 | 1 | 12 | 12 | 6 | 8 |
| 2 | 10 | 9 | 5 | 7 | |
| 95 | 1 | 12 | 11 | 6 | 7 |
| 2 | 9 | 7 | 4 | 6 | |
| 115 | 1 | 11 | 9 | 5 | 6 |
| 2 | 7 | 6 | 3 | 5 | |
| 130 | 1 | 9 | 8 | 4 | 5 |
| 2 | 6 | 5 | 3 | 4 |
| Microprocessor SKU (W) | # of microprocessor(s) |
Non-redundant or N+1 with OVS1, N=5 | N+1 redundant, N=5 | N+N redundant, N=3 | N+N redundant with OVS1, N=3 |
|---|---|---|---|---|---|
| 50 | 1 | 12 | 12 | 12 | 12 |
| 2 | 12 | 12 | 12 | 12 | |
| 60 | 1 | 12 | 12 | 12 | 12 |
| 2 | 12 | 12 | 12 | 12 | |
| 70 | 1 | 12 | 12 | 12 | 12 |
| 2 | 12 | 12 | 12 | 12 | |
| 80 | 1 | 12 | 12 | 12 | 12 |
| 2 | 12 | 12 | 12 | 12 | |
| 95 | 1 | 12 | 12 | 12 | 12 |
| 2 | 12 | 12 | 10 | 12 | |
| 115 | 1 | 12 | 12 | 12 | 12 |
| 2 | 12 | 12 | 8 | 12 | |
| 130 | 1 | 12 | 12 | 12 | 12 |
| 2 | 12 | 12 | 7 | 11 |
| Microprocessor SKU (W) | # of microprocessor(s) |
Non-redundant or N+1 with OVS1, N=5 | N+1 redundant, N=5 | N+N redundant, N=3 | N+N redundant with OVS1, N=3 |
|---|---|---|---|---|---|
| 50 | 1 | 6 | 6 | 6 | 6 |
| 2 | 6 | 6 | 6 | 6 | |
| 60 | 1 | 6 | 6 | 6 | 6 |
| 2 | 6 | 6 | 6 | 6 | |
| 70 | 1 | 6 | 6 | 6 | 6 |
| 2 | 6 | 6 | 6 | 6 | |
| 80 | 1 | 6 | 6 | 6 | 6 |
| 2 | 6 | 6 | 6 | 6 | |
| 95 | 1 | 6 | 6 | 6 | 6 |
| 2 | 6 | 6 | 5 + 1 microprocessor node | 6 | |
| 115 | 1 | 6 | 6 | 6 | 6 |
| 2 | 6 | 6 | 5 | 6 | |
| 130 | 1 | 6 | 6 | 5 + 1 microprocessor node | 6 |
| 2 | 6 | 6 | 4 + 1 microprocessor node | 5 + 1 microprocessor node |
- OVS (Oversubscription) of the power system allows for more efficient use of the available system power.
- The 130-watt GPU is IBM option part number 00J6160.
| Microprocessor SKU (W) | # of microprocessor(s) |
Non-redundant or N+1 with OVS1, N=5 | N+1 redundant, N=5 | N+N redundant, N=3 | N+N redundant with OVS1, N=3 |
|---|---|---|---|---|---|
| 50 | 1 | 6 | 6 | 5 + 1 microprocessor node | 6 |
| 2 | 6 | 6 | 5 | 6 | |
| 60 | 1 | 6 | 6 | 5 | 6 |
| 2 | 6 | 6 | 4 + 1 microprocessor node | 5 + 1 microprocessor node | |
| 70 | 1 | 6 | 6 | 5 | 6 |
| 2 | 6 | 6 | 4 + 1 microprocessor node | 5 + 1 microprocessor node | |
| 80 | 1 | 6 | 6 | 5 | 6 |
| 2 | 6 | 6 | 4 + 1 microprocessor node | 5 + 1 microprocessor node | |
| 95 | 1 | 6 | 6 | 4 + 2 microprocessor node | 6 |
| 2 | 6 | 6 | 4 | 5 | |
| 115 | 1 | 6 | 6 | 4 + 1 microprocessor node | 5 + 1 microprocessor node |
| 2 | 6 | 6 | 3 + 1 microprocessor node | 4 + 1 microprocessor node | |
| 130 | 1 | 6 | 6 | 4 + 1 microprocessor node | 5 |
| 2 | 6 | 6 | 3 + 1 microprocessor node | 4 + 1 microprocessor node |
- OVS (Oversubscription) of the power system allows for more efficient use of the available system power.
- The 225-watt GPUs include IBM option part numbers 00D4192, 00J6161, 00J6163, and 00J6165.
| Microprocessor SKU (W) | # of microprocessor(s) |
Non-redundant or N+1 with OVS1, N=5 | N+1 redundant, N=5 | N+N redundant, N=3 | N+N redundant with OVS1, N=3 |
|---|---|---|---|---|---|
| 50 | 1 | 6 | 6 | 5 + 1 microprocessor node | 6 |
| 2 | 6 | 6 | 4 + 1 microprocessor node | 6 | |
| 60 | 1 | 6 | 6 | 5 | 6 |
| 2 | 6 | 6 | 4 + 1 microprocessor node | 5 + 1 microprocessor node | |
| 70 | 1 | 6 | 6 | 5 | 6 |
| 2 | 6 | 6 | 4 + 1 microprocessor node | 5 + 1 microprocessor node | |
| 80 | 1 | 6 | 6 | 5 | 6 |
| 2 | 6 | 6 | 4 + 1 microprocessor node | 5 + 1 microprocessor node | |
| 95 | 1 | 6 | 6 | 4 + 2 microprocessor node | 5 + 1 microprocessor node |
| 2 | 6 | 6 | 4 | 5 | |
| 115 | 1 | 6 | 6 | 4 + 1 microprocessor node | 5 + 1 microprocessor node |
| 2 | 6 | 6 | 3 + 1 microprocessor node | 4 + 1 microprocessor node | |
| 130 | 1 | 6 | 6 | 4 | 5 |
| 2 | 6 | 6 | 3 + 1 microprocessor node | 4 |
- OVS (Oversubscription) of the power system allows for more efficient use of the available system power.
- The 235-watt GPU is IBM option part number 00FL133.
| Microprocessor SKU (W) | # of microprocessor(s) |
Non-redundant or N+1 with OVS1, N=5 | N+1 redundant, N=5 | N+N redundant, N=3 | N+N redundant with OVS1, N=3 |
|---|---|---|---|---|---|
| 50 | 1 | 6 | 6 | 4 + 2 microprocessor node | 5 + 1 microprocessor node |
| 2 | 6 | 6 | 4 | 5 | |
| 60 | 1 | 6 | 6 | 4 | 5 |
| 2 | 6 | 6 | 3 + 2 microprocessor node | 4 + 2 microprocessor node | |
| 70 | 1 | 6 | 6 | 4 | 5 |
| 2 | 6 | 6 | 3 + 2 microprocessor node | 4 + 2 microprocessor node | |
| 80 | 1 | 6 | 6 | 4 | 5 |
| 2 | 6 | 6 | 3 + 2 microprocessor node | 4 + 2 microprocessor node | |
| 95 | 1 | 6 | 6 | 4 | 4 + 2 microprocessor node |
| 2 | 6 | 6 | 3 + 1 microprocessor node | 4 + 1 microprocessor node | |
| 115 | 1 | 6 | 6 | 3 + 2 microprocessor node | 4 + 2 microprocessor node |
| 2 | 6 | 5 + 1 microprocessor node | 3 | 3 + 2 microprocessor node | |
| 130 | 1 | 6 | 6 | 3 + 2 microprocessor node | 4 + 1 microprocessor node |
| 2 | 6 | 5 + 1 microprocessor node | 3 | 3 + 2 microprocessor node |
- OVS (Oversubscription) of the power system allows for more efficient use of the available system power.
- The 300-watt GPU is IBM option part number 00J6162.
1300-watt power supply supportability
The following table provides the 1300-watt power supply supportability to have better performance and power efficiency.
| Quantity of 1300-watt power supplies | FPC power bank | ||
|---|---|---|---|
| Non-redundant | N+1 redundant | N+N redundant | |
| 2 | Support | Non-support | |
| 3 | |||
| 4 | |||
| 5 | |||
| 6 | Support | ||
If this is the initial installation of the compute node in the chassis, you must configure the compute node through the Setup utility and install the compute node operating system (see Updating the compute node configuration).
If you have changed the configuration of the compute node or if you are installing a different compute node from the one that you removed, you must configure the compute node through the Setup utility, and you might have to install the compute node operating system (see Using the Setup utility).