Use this information to install a water-cooled technology tray in
a Lenovo NeXtScale n1200 Enclosure
Type 5468.
Before you install the
water-cooled technology tray in
a chassis, read
Safety and
Installation guidelines.
Statement
21
CAUTION:
Hazardous energy is present when
the water-cooled technology tray is
connected to the power source. Always replace the compute tray cover
before installing the water-cooled technology tray.
If
you are installing a water-cooled technology tray model
without an integrated Ethernet controller, you must install a network
interface adapter before you install the water-cooled technology tray in
the chassis for management network communication. For a list of supported
optional devices for the water-cooled technology tray,
see the IBM ServerProven website.
To install the water-cooled technology tray in
a chassis, complete the following steps.
Figure 1. Installing the water-cooled technology tray in
a Lenovo NeXtScale n1200 Enclosure
Type 5468
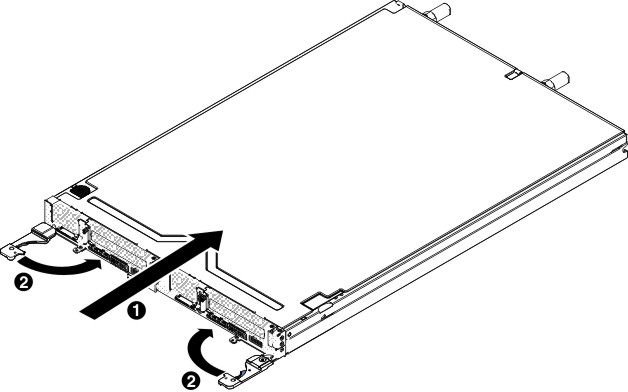
- Select the tray bay.
Notes:
- If you are reinstalling a water-cooled technology tray that
you removed, you must install it in the same tray bay from which you
removed it. Some water-cooled technology tray configuration
information and update options are established according to tray bay
number. Reinstalling a water-cooled technology tray into
a different tray bay can have unintended consequences. If you reinstall
the water-cooled technology tray into
a different tray bay, you might have to reconfigure the water-cooled technology tray.
- To maintain proper system cooling, do not operate the Lenovo NeXtScale n1200 Enclosure
Type 5468 without
a water-cooled technology tray or
tray bay filler in each tray bay.
- Make sure that the front handles on the water-cooled technology tray are
in the open position.
- Slide the water-cooled technology tray into
the tray bay until it stops.
- Push the front handles on the front of the water-cooled technology tray to
the closed position.
Note: After the water-cooled technology tray is
installed, the IMM2.1 in the water-cooled technology tray initializes.
This process takes approximately 90 seconds. The power LED flashes
rapidly, and the power button on the water-cooled technology tray does
not respond until this process is complete.
- Press the power button to turn on both systems in the water-cooled technology tray (see Turning on the server for instructions).
- Make sure that the power LED on the water-cooled technology tray control
panel is lit continuously, indicating that the water-cooled technology tray is
receiving power and is turned on.
- If you have other water-cooled technology tray to
install, do so now.
If this is the initial installation of the water-cooled technology tray in
the chassis, you must configure the water-cooled technology tray through
the Setup utility and install the water-cooled technology tray operating
system.
If you have changed the configuration of the water-cooled technology tray or
if you are installing a different water-cooled technology tray from
the one that you removed, you must configure the water-cooled technology tray through
the Setup utility, and you might have to install the water-cooled technology tray operating
system (see Using the Setup utility).