Installing a 3.5-inch hard disk drive

Use this information to install a 3.5-inch SAS/SATA hard disk drive.

Before installing a 3.5-inch hard disk drive, read the following information:
  • Inspect the drive tray for signs of damage.
  • To maintain proper system cooling, do not operate the server for more than 10 minutes without either a drive or a filler panel installed in each drive bay.

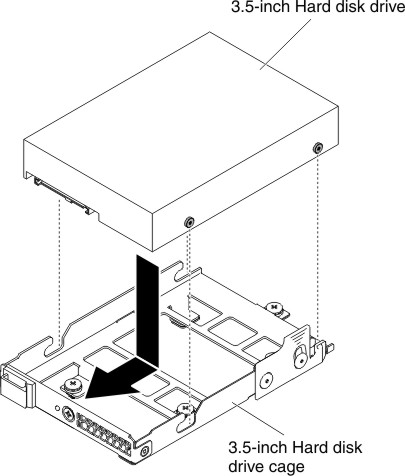
To install a 3.5-inch SAS/SATA hard disk drive, complete the following steps.

  1. Read Safety and Installation guidelines.
  2. If the compute node is installed in an IBM NeXtScale n1200 Enclosure, remove it (see Removing a compute node from a chassis for instructions).
  3. Carefully lay the compute node on a flat, static-protective surface, orienting the compute node with the bezel pointing toward you.
  4. Remove the cover (see Removing the compute node cover).
  5. Remove the filler panel, if one is present.
  6. Touch the static-protective package that contains the disk drive to any unpainted metal surface on the server; then, remove the disk drive from the package and place it on a static-protective surface.
  7. Align the drive with the guide rails in the bay; then, carefully slide the drive assembly into the drive bay until the drive snaps into place.
    Figure 1. 3.5-inch hard disk drive installation
    3.5-inch hard disk drive installation
  8. Check the hard disk drive status indicator to make sure that the hard disk drive is operating correctly. After you replace a failed hard disk drive, the green activity LED flashes as the disk spins up. The yellow LED turns off after approximately 1 minute. If the new drive starts to rebuild, the yellow LED flashes slowly, and the green activity LED remains lit during the rebuild process. If the yellow LED remains lit, see the Hard disk drive problems for more information.
    Note: You might have to reconfigure the disk arrays after you install hard disk drives. See the RAID documentation on the IBM website at the IBM support portal for information about RAID adapters.
After you install the hard disk drive backplate, complete the following steps:
  1. Install the cover onto the compute node (see Installing the compute node cover for instructions).
  2. Install the compute node into the chassis (see Installing a compute node in a chassis for instructions).