Use this information to install a 2.5-inch hard disk drive.
The following notes describe the types of hard disk drives
that the server supports and other information that you must consider
when you install a hard disk drive:
- Depending on the model, the compute node supports up to two 2.5-inch SAS/SATA hard disk drives in the bays.
- For a list of supported optional devices for the server, see the Lenovo ServerProven website.
- Inspect the drive and drive bay for signs of damage.
- Make sure that the drive is correctly installed in the drive bay.
- See the documentation for the ServeRAID adapter for instructions for installing a hard disk drive.
- All drives in the server must have the same throughput speed rating; using drives with different speed ratings might cause all drives to operate at the speed of the slowest drive.
- You must turn off the compute node when you perform any steps that involve installing or removing cables.
Attention: Static electricity that is released
to internal server components when the server is powered-on might
cause the server to halt, which might result in the loss of data.
To avoid this potential problem, always use an electrostatic-discharge
wrist strap or other grounding system when you work inside the server
with the power on.
To install a 2.5-inch hard disk drive, complete the following steps.
-
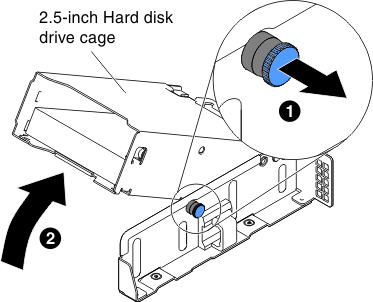
Pull the plunger of the 2.5-inch hard disk drive cage outward
and rotate the cage upward.
Figure 1. Lift the 2.5-inch hard disk drive cage upward
-
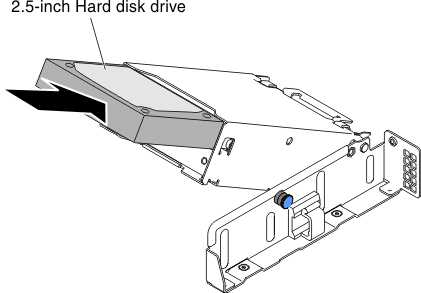
Align the drive with the bay of the hard disk drive cage;
then, carefully slide the drive into the drive bay until the drive
snaps into place.
Figure 2. 2.5-inch hard disk drive installation
-
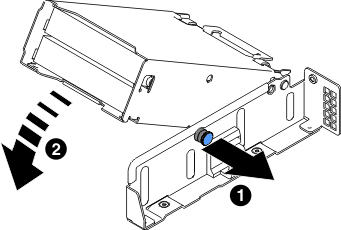
Pull the plunger of the 2.5-inch hard disk drive cage outward
and rotate the cage downward until the cage snaps into place.
Figure 3. Put the 2.5-inch hard disk drive cage downward
Note:- After you install the hard disk drive, check the disk drive status LEDs to verify that the hard disk drive is operating correctly. If the yellow hard disk drive status LED is lit continuously, that drive is faulty and must be replaced. If the green hard disk drive activity LED is flashing, the drive is being accessed.
- If the server is configured for RAID operation through an optional ServeRAID adapter, you might have to reconfigure your disk arrays after you install hard disk drives. See the ServeRAID documentation on the Lenovo ServeRAID Support CD for additional information about RAID operation and complete instructions for using ServeRAID manager.
After you install the hard disk drive backplate, complete
the following steps:
- Install the cover onto the compute node (see Installing the compute node cover for instructions).
- Install the compute node into the chassis (see Installing a compute node in a chassis for instructions).