Replacing a PCI riser-cage assembly

Before you install a PCI riser-cage assembly, complete the following steps:
  1. Read Safety and Installation guidelines.
  2. If the compute node is installed in a NeXtScale n1200 Enclosure, remove it (see Removing a compute node from a chassis for instructions).
  3. Carefully lay the compute node on a flat, static-protective surface, orienting the compute node with the bezel pointing toward you.
Note:
  1. PCI riser-cage brackets must be installed even if you do not install an adapter.
  2. There must be either a DIMM or DIMM filler installed for all 16 DIMM slots.

To install a PCI riser-cage assembly, complete the following steps:
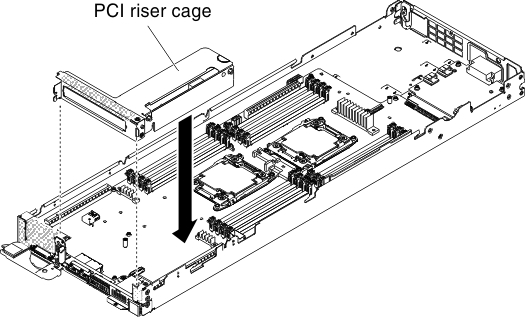
  1. Remove the cover (see Removing the compute node cover).
  2. Remove the PCI filler panel, if one is present, from the front of the server.
  3. Align the PCI riser-cage assembly with the PCI riser connector on the system board; then, grasp the rear side of the PCI riser-cage touch point and the front PCI rise- cage suitable location of the PCI riser-cage assembly.
  4. Press down firmly until the PCI riser-cage assembly is seated correctly in the connector on the system board.
    Figure 1. PCI riser-cage assembly installation
    PCI riser-cage assembly installation
  5. Replace the cover (see Installing the compute node cover).
  6. Slide the server into the rack.
  7. Reconnect the power cords and any cables that you removed.
  8. Turn on the peripheral devices and the server.