Use this information to replace a ServeRAID SAS/SATA controller.
Before you install the SAS/SATA adapter from the system board,
complete the following steps:
- Read Safety and Installation guidelines.
- If the compute node is installed in a NeXtScale n1200 Enclosure, remove it (see Removing a compute node from a chassis for instructions).
- Carefully lay the compute node on a flat, static-protective surface, orienting the compute node with the bezel pointing toward you.
Depending on the server model, the server comes with either
a ServeRAID N2215, or a ServeRAID M5225 SAS/SATA adapter installed.
Note: Remove
the PCI bracket that comes with ServeRAID M5225 adapter before installing
it in the dedicated connector on the system board.
You can replace the ServeRAID controller with another supported ServeRAID controller. For a list of supported ServeRAID controllers, see the Lenovo ServerProven website.
Note: For brevity,
in this documentation the ServeRAID SAS/SATA controller is often referred
to as the SAS/SATA adapter or the ServeRAID adapter.
To install the SAS/SATA adapter to the system board, complete the following steps:
Note: If possible, backup or record your RAID configuration
information before replacing the adapter. See the documentation for
your RAID adapter for information and instructions. Documentation
for ServeRAID adapters can be downloaded from the Lenovo Support Portal.
-
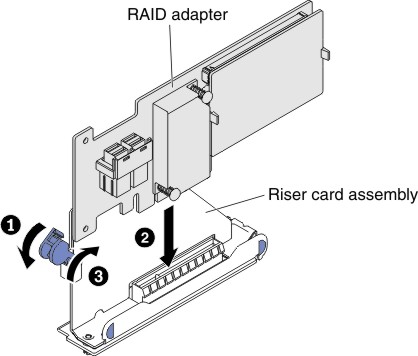
Install the SAS/SATA adapter to the riser cage and close
the retention bracket. It will secure the SAS/SATA adapter in place
when the adapter is firmly seated into the connector.
Figure 1. RAID adapter installation
-
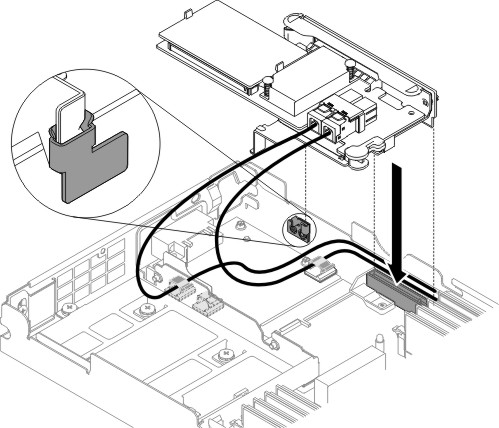
Insert the adapter riser cage into the RAID connector until
it is firmly seated.
Attention: Incomplete insertion might cause damage to the server or the adapter.Figure 2. ServeRAID adapter installation
Note: Remove the PCI bracket that comes with ServeRAID N2215 adapter before installing it in the dedicated connector on the system board.
Note: When you restart the server, you are prompted to import
the existing RAID configuration to the new ServeRAID adapter.