Use this information to install the compute node.
Note: This procedure should be performed only by trained service
technicians.
Before you install the compute node, complete
the following steps:
- Read Safety and Installation guidelines.
- If the compute node is installed in a NeXtScale n1200 Enclosure, remove it (see Removing a compute node from a chassis for instructions).
- Carefully lay the compute node on a flat, static-protective surface, orienting the compute node with the bezel pointing toward you.
- Obtain the following for use during the replacement procedure
(see Parts listing, Lenovo NeXtScale nx360 M5 compute node).
- Alcohol wipes (part number 59P4739)
- Bezel
- RFID tag (required only if the compute node came with a RFID tag attached to the bezel)
- T8 torx screwdriver (part number 00FK488, provided on the back of the chassis)
- Thermal grease kit (part number 41Y9292)
Important: When you replace the system board,
you must update the compute node with the latest firmware or restore
the preexisting firmware. Make sure that you have the latest firmware
or a copy of the preexisting firmware before you proceed. See Updating the firmware for more information.
To install the compute node, complete the following steps.
Figure 1. Major components of the compute node
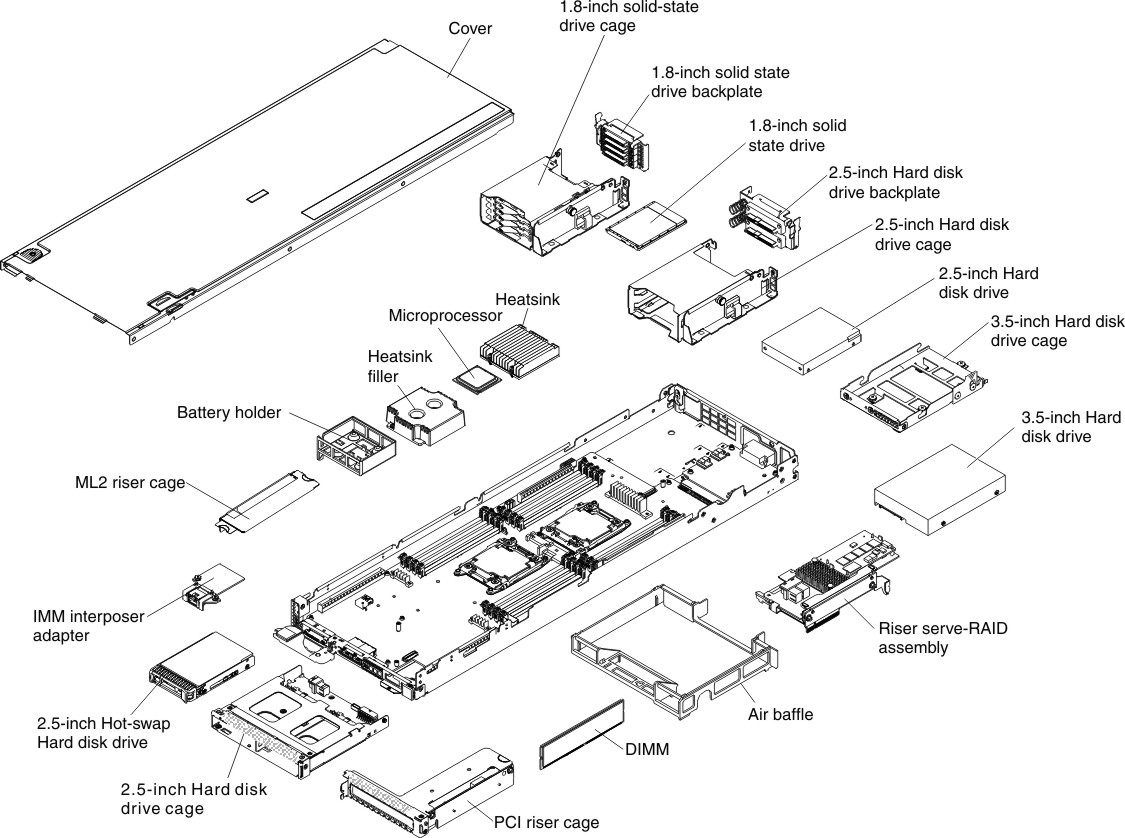
Install all of the components in the following list that
you removed from the old compute node onto the new compute node:
- Air baffles (see Replacing the air baffle).
- DIMMs (see Installing a memory module).
- Hard disk drives and hard disk drive fillers (see Installing a 3.5-inch hard disk drive, Installing a 2.5-inch hard disk drive, and Installing a 1.8-inch hard disk drive).
- Hard disk drive cages (see Installing the rear hard disk drive cage).
- Microprocessors, heat sinks, and microprocessor heat-sink fillers. Use the microprocessor installation tool that comes with the replacement microprocessor to remove each microprocessor from the compute node and install each one immediately in the new compute node (see Removing a microprocessor and heat sink and Replacing a microprocessor and heat sink).
- Hard disk drive backplate (see Installing the hard disk drive backplate).
After you install the compute node, complete the following
steps:
- Install the cover onto the compute node (see Installing the compute node cover for instructions).
- Install the compute node into the chassis (see Installing a compute node in a chassis for instructions).
- If any Features on Demand (FOD) features are installed in the compute node, see the instructions in the Lenovo Feature on Demand User's Guide to reactivate these features. To download this document, go to the Lenovo Features on Demand website, log in, and click Help.
- Update the Universal Unique Identifier (UUID) and the Vital Product Data (VPD). Use the Advanced Settings Utility to update the UUID and VPD in the UEFI-based compute node (see Updating the Universal Unique Identifier (UUID)).
- Update the compute node with the latest firmware or restore the preexisting firmware (see Updating the firmware for more information).