Removing the system board

Use this information to remove the system board.

Read the safety information in Safety and Installation guidelines.

If you are replacing a server component in the water-cooled technology tray, you need to remove the water-cooled technology tray from the chassis enclosure and refer to the Removing a water-cooled technology tray from a chassis and Installing a water-cooled technology tray in a chassis sections.

Note:
  1. When you replace the system board, you must either update the server with the latest firmware or restore the pre-existing firmware that the customer provides on a diskette or CD image. Make sure that you have the latest firmware or a copy of the pre-existing firmware before you proceed.
  2. When you replace the system board, make sure that you remove the Integrated Management Module 2.1 (IMM2.1) Advanced Upgrade and place it on the new system board. For information about the Advanced Upgrade, see Using the remote presence and blue-screen capture features
    Note: You have to reactivate the Features on Demand (FoD) after replacing the system board.
  3. When you replace the system board, you must either update the server with the latest firmware or restore the pre-existing firmware that the customer provides on a diskette or CD image. Make sure that you have the latest firmware or a copy of the pre-existing firmware before you proceed.

To remove the system board, complete the following steps.
  1. Remove the cover (see Removing the cover).
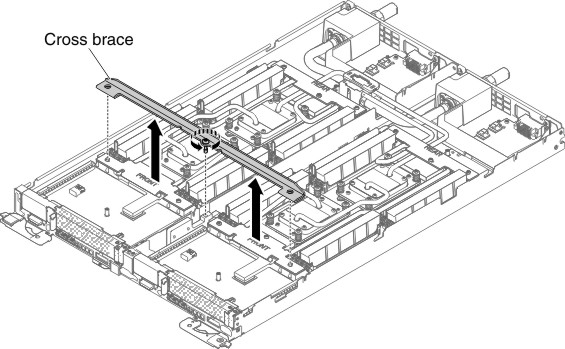
  2. Remove the cross brace.
    Figure 1. Cross brace removal
    Cross brace removal
  3. Remove the interposer filler (1 captive screw).
  4. Remove any of the following components that are installed on the system board and put them in a safe, static-protective place:
    • Risers and adapters (see Removing the optional PCI or ML2 adapter)
    • DIMMs, DIMM covers, and DIMM fillers (see Removing a DIMM)
      Note: Make a note of the location of each DIMM as you remove it, so that you can later reinstall it in the same connector.
    • Power distribution board and air baffle (see Removing the power distribution board)
    • Remove the water loop (see Removing a copper water loop)
    • Microprocessors (see Removing a microprocessor)
      Note:
      1. Transfer microprocessors into new system board before removing the old system board.
      2. Remove the socket covers from the microprocessor sockets on the new system board and place them on the microprocessor sockets of the system board you are removing.
      3. Do not allow the thermal grease to come in contact with anything, and keep each heat sink paired with its microprocessor for reinstallation. Contact with any surface can compromise the thermal grease and the microprocessor socket.
  5. Remove the 2 jack screws in the front bulkhead that secure the system board to the water-cooled technology tray, and put the screws in a safe place.
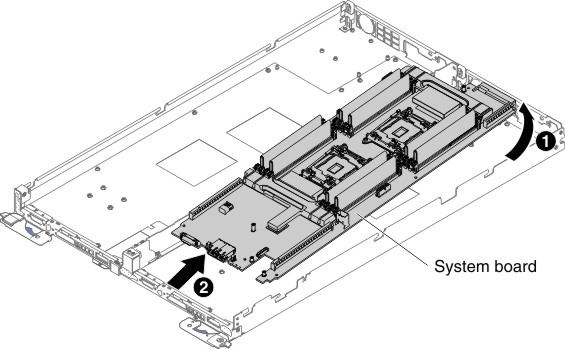
  6. Carefully hold on to the edges of the system board. Avoid touching the connectors on the system board. Lift and tilt the system board upwards and slightly push the system board away from the front bulkhead. Then carefully lift and remove the system board from the server.
    Figure 2. System board removal
    System board removal
    Note: When you remove the system board from the server, avoid touching the cable clips on the side of the chassis and the connectors on the system board. Be careful not to damage any surrounding components inside the chassis.

If you are instructed to return the server component or optional device, follow all packaging instructions, and use any packaging materials for shipping that are supplied to you.
Attention: Make sure to place the socket cover for the microprocessor socket on the system board before returning the system board.